Splash 就是通常说的启动页,启动页不是必须的,也不一定要用单独的 Activity 实现。使用 Splash 的大致出于以下看考虑:
- 为了加入开屏广告,在 App 广告中,这种开屏广告价格是比较高的。
- App 从启动到到进入第一个功能界面需要一定的时间,App 会持续一段时间的白屏。特别是冷启动,以及第一次安装启动的时候,这种白屏会特别明显。
系统在启动 App 的第一个 Activity 时,会先显示 Activity 对应 Window 的 Background,
所以可以将第一个 Activity 的 WindowBackground 设置为特定的颜色或者图片,那么在启动阶段,会显示我们设置的 WindowBackground,而不是持续的白屏。
values/styles.xml
1
2
3
4
5
6
| <style name="SplashBase" parent="AppTheme">
<item name="android:windowNoTitle">true</item>
<item name="android:windowActionBar">false</item>
<item name="android:windowFullscreen">true</item>
<item name="android:windowBackground">@drawable/as_splash</item>
</style>
|
一个典型的 Splash 界面如下:
即底部有一个产品的 Logo,界面中间或者上部是产品的 Slogan 或者图标。
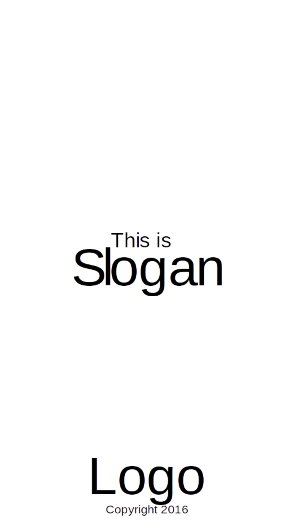
为了实现这种效果,最简单的方式就是把 WindowBackground 设置成一张带有 Logo 和 Slogan 的全屏图片。不过这种处理方式太暴力了,而且会发生不可避免的变形。
比较合适的方式是把界面元素分成多个部分,然后通过 LayerDrawable 组合到一起。如下:
1
2
3
4
5
6
7
8
9
10
11
| <?xml version="1.0" encoding="utf-8"?>
<layer-list xmlns:android="http://schemas.android.com/apk/res/android">
<item android:drawable="@android:color/white" />
<item
android:drawable="@drawable/as_slogan"
android:gravity="center" />
<item
android:bottom="16dp"
android:drawable="@drawable/as_logo"
android:gravity="bottom|center_horizontal" />
</layer-list>
|
在 6.0 以下的系统中,对 item 的解析可能会有问题,所以,为了兼容老系统,建议这么写:
1
2
3
4
5
6
7
8
9
10
11
12
13
| <layer-list xmlns:android="http://schemas.android.com/apk/res/android">
<item android:drawable="@android:color/white" />
<item>
<bitmap
android:gravity="center"
android:src="@drawable/as_slogan" />
</item>
<item android:bottom="16dp">
<bitmap
android:gravity="bottom"
android:src="@drawable/as_logo" />
</item>
</layer-list>
|
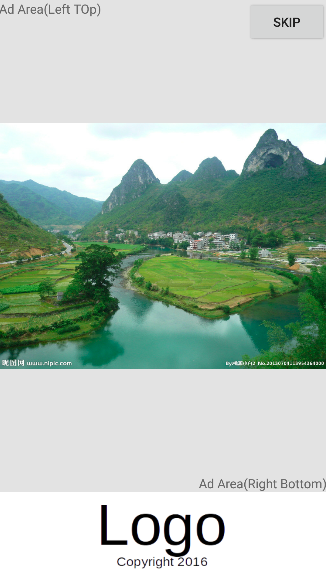
这样可以避免变形,也方便计算各种边距。要显示广告的时候,则可以将广告区域填满 Logo 上部区域(前景区域),从而遮住 Slogan 区域(背景区域)。如下:
1
2
3
4
5
6
7
8
9
10
11
12
13
14
15
16
17
18
19
20
21
22
23
24
25
26
27
28
29
30
31
32
33
34
35
36
37
38
39
40
41
42
| <?xml version="1.0" encoding="utf-8"?>
<RelativeLayout xmlns:android="http://schemas.android.com/apk/res/android"
xmlns:tools="http://schemas.android.com/tools"
android:id="@+id/activity_main"
android:layout_width="match_parent"
android:layout_height="match_parent"
tools:context="dev.xesam.android.splash.demo.SplashActivity">
<RelativeLayout
android:layout_width="match_parent"
android:layout_height="match_parent"
android:layout_marginBottom="100dp"
android:background="#e4e4e4">
<TextView
android:layout_width="wrap_content"
android:layout_height="wrap_content"
android:text="Ad Area(Left TOp)" />
<ImageView
android:layout_width="match_parent"
android:layout_height="wrap_content"
android:layout_centerVertical="true"
android:adjustViewBounds="true"
android:scaleType="fitCenter"
android:src="@drawable/ad_1" />
<Button
android:layout_width="wrap_content"
android:layout_height="wrap_content"
android:layout_alignParentRight="true"
android:text="Skip" />
<TextView
android:layout_width="wrap_content"
android:layout_height="wrap_content"
android:layout_alignParentBottom="true"
android:layout_alignParentRight="true"
android:text="Ad Area(Right Bottom)" />
</RelativeLayout>
</RelativeLayout>
|
如果 Splash 还有广告的话,大致会类似下面:
即底部的产品 Logo 保持不变,界面上部换成对应的广告。
问题
如果要求在 Splash 的时候 Fullscreen,也就是隐藏 StatusBar,可以使用 Fullscreen 主题。 不过 Fullscreen 主题并不会隐藏底部的 Navigation Bar。
在 5.0+ 带有 Navigation Bar 的手机上,windowBackground 会显示在 Navigation Bar 下面,也就是背景图会被遮挡了一部分。
因此,在 5.0+ 系统中,可以设置:
values-v21/styles.xml
1
2
3
| <style name="Splash" parent="SplashBase">
<item name="android:windowDrawsSystemBarBackgrounds">false</item>
</style>
|
当然,也可以使用
1
| getWindow().getDecorView().setSystemUiVisibility()
|
来隐藏 Navigation Bar,不过这种操作会导致其他的问题:当 Navigation Bar 这种系统 UI 被隐藏之后,用户的第一次触屏操作会导致系统 UI 的显示,
结果就导致其他 View 的点击事件失效,需要两次点击才能触发 App 的事件操作。所以,如果 Splash 不是单纯的品牌展示作用,还是尽量避免这种处理方式。
示例 Demo 参见 GitHub AndroidSplash